Saturday, December 27, 2008

Using Biztalk in transaction mode with a WCF client

While trying to use a WCF client to send a message to Biztalk as a transaction, I got the following error:


"Cannot access a disposed object. Object name: 'TransactionScope' "


On investigation, I found that this can happen when:

  1. Recieve port/location does not have a corresponding subscription (orchestration / send port) created.

  2. Send Port is created but not enlisted. This is same as no subscription found in database.

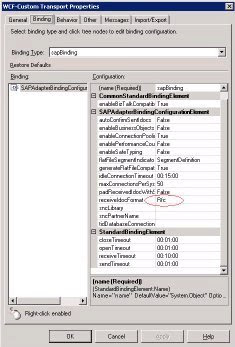
When enable transactions check box is clicked while configuring receive location as shown below:


Behind the scenes, a transaction scope object is created that will attach itself to incoming message sent from a client and form a one continious transaction involving MSDTC. This enables WCF client to control the whole transaction involving Biztalk. Client can use "commit" and "rollback" commands to commit and rollback message in Biztalk messagebox database. Very powerful!

Reason:

At core, Biztalk works on pub-sub mechanism. In absence of any subscription, receive location can't really participate in transaction and create a transaction object. Hence the error is raised "cannot access a dispose object" (transaction object)

Solution is simple: Create a subscription for the receive port/location in form of a send port or an orchestration.


Sunday, October 05, 2008

Using SAP Biztalk 2006 R2 WCF adapter

Work involved in configuring SAP adapter can be divided into 2 steps. First step involves work done by Biztalk team and second step involves work done by SAP team.

Step 1: BIZTALK TEAM

Biztalk side needs to define a Program ID. SAP adapter then registers this Program ID to the SAP gateway defined in the URL. This Program ID then needs to be registered from SAP side. SAP admin should follow “Performing Tasks Using the SAP GUI for Specific SAP Adapter Scenarios” section of SAPAdapter.chm file.

Program ID will be unique per listener else SAP will send the document to random listeners. Each Receive location will be tied to a unique Program ID for an environment. Example: If same receive location is being used in 3 environments (DEV, QA and Prod) then 3 Program IDS are required to be set up for that single receive location. RFC checks the connection between SAP and biztalk using program id registered channel. SAP then sends IDOC to biztalk. Biztalk accepts this IDoc and processes it.
Configure recv location as shown:


Configure following URL at recv location

sap://CLIENT=[client ID] ;LANG=EN;@a/[servername]/[system ID]
?ListenerGwHost=[hostname]&ListenerGwServ=[gateway service name] &ListenerProgramId=[Program ID}

SAP team should supply with the above variables.
Do not forget to ask for user name and password to configure screen below:


Step 2: SAP TEAM

SAP team to supply:

1. client ID
2. servername
3. system ID
4. hostname
5. gateway service name
6. User ID
7. Password

Thursday, April 24, 2008

Configuring BAM and WSS adapter on 64 bit machine

BAM and WSS adapter have conflicting requirements for 64 bit machine. BAM needs 32 bit IIS and WSS 3.0 needs 64 bit IIS. To make matters further complex, it is not possible to host 32 bit IIS and 64 bit IIS on same 64 bit machine. So how can Biztalk communicate with a MOSS server running on 64 bit machine? Following configuration makes this possible:

1) Enable 32 bit IIS on the 64 bit machine by running following command:

cscript %SystemDrive%\inetpub\AdminScripts\adsutil.vbs set w3svc/AppPools/Enable32bitAppOnWin64 1

(1 means “true” and 0 means “false”)

2) Now, IIS is 32 bit and follow standard BAM configuration steps.
3) Install WSS 2.0 SP2 on the Biztalk machine to enable configuring WSS adapter. Also, configure WSS adapter on MOSS machine that hosts WSS 3.0
4) To install WSS 2.0, register ASP.Net 2.0 (32 bit version) from “Windows\Framework” folder by running aspnet_regiis.exe –i
5) Download and install WSS 2.0 SP2
6) Install WSS 2.0 in server farm mode and then create and extend the website. This website will host the WSS adapter.
7) When installing WSS 2.0 on clustered machine, use option “Join existing …”
8) Run Biztalk Configuration wizard and configure WSS adapter on Biztalk machine.
9) Run Biztalk Configuration Wizard on MOSS machine and configure adapter there.
10) Make the AppPool Account that is running WSS 2.0 website a member of SharePoint Group and SharePoint Site Collection on MOSS machine hosting WSS 3.0.

When WSS is configured, it creates BTSharePointAdapterWS. WSS adapter uses this web service to communicate with MOSS form libraries, lists and document libraries. This service need not be running on Biztalk machine but it should be running on MOSS machine for proper communication back and forth.

Tuesday, January 08, 2008

Cross Updating Windows Workflow Tasks in Parallel Activity

Parallel activities in Windows Workflow are independent as the name suggests. How could we then update Task A from Task B when Task A and Task B are running in parallel? After spending 1 hour, I figured it out.

1) Use "Update Task" shape for updating Task A and drop it in the "parallel" arm of Task B. The position of this task could be above the "Complete Task" or as required. But it should be under the "create task" shape for Task B.

2) Here is the imporant part. Set the correlation token as the correlation token used for Task A even though this task is under Task B related tasks. This correlation token will direct the update task to the correct task (Task A in our case)

3) Bind the TaskID to existing Task ID for Task A.

3) Use syntax "TaskProperties.ExtendedProperties["NameOfInfopathField_inTaskA_thatis_to_be_updated"]="desiredvalue"

Important:

Parallel workflows in WF are actually processed in a sequence. Left branch is processed first and then control moves towards the right . While cross updating tasks, correlation ID is the key that ties the different tasks together. For tasks on the extreme right arm, all the correlation IDs in the workflow are available. But this selection reduces are we move towards left. In order to update a task on the right side of a given task, the correlation ID will not be available from the work flow design view. But going to deign code file(*.designer.cs / *.designer.vb) gives the flexibility to link the correlation ID with the task that is to be updated.

i.e.

this.UpdateFromTaskOnLeftSide =CorrelationToken (this will be token for the task on the right side that is being updated from left side).

Monday, January 07, 2008

Accessing SQL data from Infopath Form Control

A control in infopath form can be configured to receive data from XML, WebService, SharePoint List and SQL database (only). In this article I will focus on using SQL database as secondary datasource. I used SQL database to hold values for login in one column and second column gave the user groups for that LogIn. I used these Groups to control the views that a user can access. For Example: You could add rule to restrict an IT user to view data for IT only and not for Finance or Marketing.


This is what you do:


1) Create a table and name it "RulesGroup". Add two columns : UserLogIn and UserGroup


2) In the infopath form create two text box control: UserName and UserGroup

3) Create a secondary datasource and configure it to receive data from SQL database. Use the wizard to point to the correct table.

4) In the infopath form: Use infopath function username() to populate UserName text box.
Map the UserGroup text box with following Xpath:

xdXDocument:GetDOM("RolesGroup")/dfs:myFields/dfs:dataFields/d:RolesGroup[@UserLogIn = "shashi"]/@UserGroup

PS: XML generated by the wizard marks the 2 user defined columns as "attributes". So there is need to user @ in Xpath expression.

In our case if UserName is "shashi" the UserGroup will be "Operations".

New users and Groups can be added in DB as required and accordingly Infopath Views can be programmed based on Groups.

Remember: While using form services to host infopath form, additional requirement will be creating a new Univeral Data Connection(UDC) file in Data Connection Library under the site collection. This UDC file maps the connection details between infopath form and SQL service. SQL server can't really authenticate the user name being passed directly from the infopath form. The user name comes as "" (blank). One way of getting around is to use proxy user name and password in case the user name is blank. But this will compromise security in Big Way. Use of UDC file helps in this regard. Also, it allows you set up custom User Groups based on User Names. These user groups can be then used to limit access to certain views as explained before in this article.