So, I installed Biztalk 2010 on Win2008 server with SQL server 2008 R2 on a 32 bit machine. Biztalk configuration worked smoothly as one would expect it to until the wizard tried to enable BAM portal. Biztalk configuration wizard threw an error saying "Default Web Site can't be validated". I did some research and found that almost everyone that had this error got it fixed by installing "IIS6 compatibility" role on the Server. But in my case, this role was already installed. But just to be sure, I uninstalled it--> restarted the server and installed it back. Only to find that it did not make any difference!
I tried hacking my way by physically creating BAM application on the IIS but did not work either. Since BAM is a pre-compiled version, I could not debug it as I would do in an asp.net web application. Then, I thought of creating a new website called "BAM" at the same level as the "Default Website" but on a different port (not 80). In my case, I used port 81. I ran the Biztalk Configuration wizard, pointed it to "BAM" site instead of "Default WebSite" and it worked!!
Later, I did some research and found out that this is a "bug" or a "known behavior" with Biztalk 2010 installation. It seems creating a new site for BAM is generally accepted solution.
Check out :http://social.msdn.microsoft.com/Forums/en/biztalkgeneral/thread/ef650460-c219-4b34-bc7a-41bb7e75ec81
I would like to hear from others who faced/or not faced same issue.
Thursday, December 30, 2010
Monday, December 27, 2010
Biztalk and CEP (Complex Event Processing)
For people interested in integrating CEP with Biztalk, check out the white paper by Jesus Rodriguez at :
http://www.microsoft.com/downloads/en/details.aspx?FamilyID=6c1da607-4785-4668-a274-6898c38ea603
StreamInsight is part of SQL 2008R2. Do some reading on StreamInsight before checking out this paper.
This paper is very conceptual and does not provide any code snippets. If you are looking for some code samples, then use the samples that come with StreamInsight download and extend them.
Monday, December 20, 2010
Appfabric Connect Feature on Biztalk 2010
When Dublin (now Windows Server Appfaric) was close to being released, there was lot of talk around the speculative demise of Biztalk. Some of the key differentiators identified at that time were Mapper tool and ability to resume message flow using persistence data store. At that time, I wrote that it will be matter of time that these differentiators between Biztalk and Dublin will fade away (check the comment section of http://geekswithblogs.net/cyoung/archive/2008/10/15/125848.aspx). Current Avatar of Dublin aka WS Appfabric , provides the ability to persist data and supports resumption of messages. “AppFabric Connect” feature, that is part of Biztalk 2010 installation, exposes Biztalk mapper and LOB directly. So to be used with workflows, that can then be hosted on Windows Server Appfabric which in turn is part of IIS. Light weight applications does not need heavy weight Biztalk database anymore. Low latency scenarios can now easily be constructed using IIS hosting using Dublin.
Since this feature is part of Biztalk 2010 installation, Biztalk license is needed to use this feature. In future this can and will change. It will then be possible to create custom WF that can be persisted to a DB and exposed as WCF endpoints, while mapping .net types using Biztalk with same set of mapping functoids that are part of Biztalk world. And all of this will be free!
Since this feature is part of Biztalk 2010 installation, Biztalk license is needed to use this feature. In future this can and will change. It will then be possible to create custom WF that can be persisted to a DB and exposed as WCF endpoints, while mapping .net types using Biztalk with same set of mapping functoids that are part of Biztalk world. And all of this will be free!
Thursday, December 16, 2010
Little trick....that will help you long way
During the process of creating cloud project using VStudio, don't forget to mark external "reference" assemblies as "Copy Local =True". If this is not done, your application will run fine on your local cloud emulator but throw an "asp.net application error" when executed on the cloud. Every dll that is referenced, other than the default dlls, that are part of cloud project, should have property "copy local = true". When Visual Studio creates deployment package for cloud, it looks for this property. It adds all the dlls with "copy local = true" in the package and when the solution is deployed on the cloud, these additional dlls are deployed on the cloud too. In the absence of these dlls, your cloud application will throw “asp.net application error”.
Tuesday, December 14, 2010
Biztalk and the Cloud
I was in NY city on Dec 1 for the Azure Firestarter event at the Microsoft Office. It was a nice overview of Azure. For past year or so, I have been thinking of getting my hands dirty with this technology. Between work and family, never really got a chance to do so. But this time, after the event I promised myself to actually put what I learnt into practice. Moreover so, because the free registration to Azure portal would expire in few weeks time.
So, I came up with a simple scenario.
1. Expose a CreditScore service using Biztalk within a firewall.
2. Publish this Biztalk Orchestration as WCF to Cloud Endpoint using WCF publishing
wizard
3. Use a simple windows client application to send a message and receive a reply from this Biztalk service exposed within firewall.
Step 1:
Create a two way Biztalk Orchestration that accepts an xml message(First Name, Last Name, SSN) and returns a message (Credit Score and Comments).
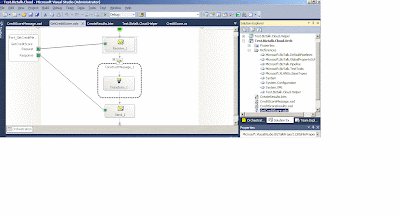
(Image 1)
Step 2.
Publish this Orchestration as the cloud endpoint.
Pre-Requisite:
1. Biztalk 2010
2. Windows AppFabric SDK 1.0
3. Windows Azure AppFabric Account to create the URL of cloud Endpoint (Free, if you have MSDN subscription)
4. Biztalk 2010 adapter pack
For details checkout : support.microsoft.com/kb/2449478
Step 2. Create a windows client to test this Biztalk service using endpoint exposed in the cloud.
Pre-Requisite for the client machine:
1. Visual Studio(2008 sp1 or 2010)
2. Azure AppFabric SDK 1.0 (to get NetTcpRelayBinding and TransportClientEndpointBehavior).
a) Open a "Windows Form Application" Project
"C:\Program Files\Windows Azure AppFabric SDK\V1.0\Assemblies\NET3.5\Microsoft.ServiceBus.dll"
c)Add Service Reference point to the URL exposed in the cloud : Sample URL:
shashiraina-demo.servicebus.windows.net/Test.Biztalk.Cloud.Orch/. This namespace in URL is created using AppFabric Account. (Image below)
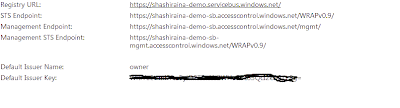 (Image 2)
d) Use the proxy to generate client side objects. I used code instead of config file because, I was not able to get "TransportClientEndpointBehavior" and "NetTcpRelayBinding" to show up in Config file. This may be because I was just using a Windows Application as test client instead of "cloud" supported client. With code, I could easily use the ServiceBus namespace and get it working.
Sample client code is below:
GetCreditScore.GetCreditScoreRequest req = new GetCreditScoreRequest();
GetCreditScore.GetCreditScoreResponse res = new GetCreditScoreResponse();
NetTcpRelayBinding tcpRelayBinding = new NetTcpRelayBinding();
TransportClientEndpointBehavior clientEndBeh = new TransportClientEndpointBehavior();
clientEndBeh.CredentialType = TransportClientCredentialType.SharedSecret;
clientEndBeh.Credentials.SharedSecret.IssuerName = "owner";
clientEndBeh.Credentials.SharedSecret.IssuerSecret = "Extract this from Appfabric Portal";// (it will look something like the crossed out section in the Image 2" )
EndpointAddress endpoint = new EndpointAddress("sb://shashiraina-demo.servicebus.windows.net/Test.Biztalk.Cloud.Orch/WcfService_Test_Biztalk_Cloud_Orch.svc");
WcfService_Test_Biztalk_Cloud_OrchClient client = new WcfService_Test_Biztalk_Cloud_OrchClient(tcpRelayBinding, endpoint);
client.Endpoint.Behaviors.Add(clientEndBeh);
req.Score = new Score(); ;
req.Score.FirstName = "Shashi";
req.Score.LastName = "Raina";
req.Score.SSN = "123-234-2323";
res.Root = new Root();
res.Root = client.GetCreditScore(req.Score);
Response from the service is below: (Go Ahead and tried it out from your machine)!
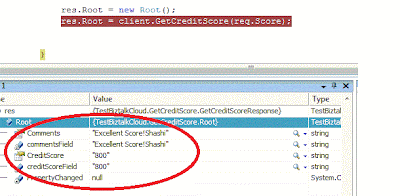
Image 3
So, without punching a hole in your DMZ, you could expose your Biztalk services to outside world. I have been involved in complex configurations in ISA reverse proxy to expose Biztalk services to outside world. But using "Appfabric Connect for Services" , all these complex configurations can be eliminated. Moreover, the ACS (Access Control Services) that is part of Azure Appfabric allows creating your own plug-in security framework.
So, I came up with a simple scenario.
1. Expose a CreditScore service using Biztalk within a firewall.
2. Publish this Biztalk Orchestration as WCF to Cloud Endpoint using WCF publishing
wizard
3. Use a simple windows client application to send a message and receive a reply from this Biztalk service exposed within firewall.
Step 1:
Create a two way Biztalk Orchestration that accepts an xml message(First Name, Last Name, SSN) and returns a message (Credit Score and Comments).

(Image 1)
Step 2.
Publish this Orchestration as the cloud endpoint.
Pre-Requisite:
1. Biztalk 2010
2. Windows AppFabric SDK 1.0
3. Windows Azure AppFabric Account to create the URL of cloud Endpoint (Free, if you have MSDN subscription)
4. Biztalk 2010 adapter pack
For details checkout : support.microsoft.com/kb/2449478
Step 2. Create a windows client to test this Biztalk service using endpoint exposed in the cloud.
Pre-Requisite for the client machine:
1. Visual Studio(2008 sp1 or 2010)
2. Azure AppFabric SDK 1.0 (to get NetTcpRelayBinding and TransportClientEndpointBehavior).
a) Open a "Windows Form Application" Project
b) Add Reference to "Microsoft.ServiceBus.dll" from location
"C:\Program Files\Windows Azure AppFabric SDK\V1.0\Assemblies\NET3.5\Microsoft.ServiceBus.dll"
c)Add Service Reference point to the URL exposed in the cloud : Sample URL:
shashiraina-demo.servicebus.windows.net/Test.Biztalk.Cloud.Orch/. This namespace in URL is created using AppFabric Account. (Image below)
(Image 2)d) Use the proxy to generate client side objects. I used code instead of config file because, I was not able to get "TransportClientEndpointBehavior" and "NetTcpRelayBinding" to show up in Config file. This may be because I was just using a Windows Application as test client instead of "cloud" supported client. With code, I could easily use the ServiceBus namespace and get it working.
Sample client code is below:
GetCreditScore.GetCreditScoreRequest req = new GetCreditScoreRequest();
GetCreditScore.GetCreditScoreResponse res = new GetCreditScoreResponse();
NetTcpRelayBinding tcpRelayBinding = new NetTcpRelayBinding();
TransportClientEndpointBehavior clientEndBeh = new TransportClientEndpointBehavior();
clientEndBeh.CredentialType = TransportClientCredentialType.SharedSecret;
clientEndBeh.Credentials.SharedSecret.IssuerName = "owner";
clientEndBeh.Credentials.SharedSecret.IssuerSecret = "Extract this from Appfabric Portal";// (it will look something like the crossed out section in the Image 2" )
EndpointAddress endpoint = new EndpointAddress("sb://shashiraina-demo.servicebus.windows.net/Test.Biztalk.Cloud.Orch/WcfService_Test_Biztalk_Cloud_Orch.svc");
WcfService_Test_Biztalk_Cloud_OrchClient client = new WcfService_Test_Biztalk_Cloud_OrchClient(tcpRelayBinding, endpoint);
client.Endpoint.Behaviors.Add(clientEndBeh);
req.Score = new Score(); ;
req.Score.FirstName = "Shashi";
req.Score.LastName = "Raina";
req.Score.SSN = "123-234-2323";
res.Root = new Root();
res.Root = client.GetCreditScore(req.Score);
Response from the service is below: (Go Ahead and tried it out from your machine)!
Image 3
So, without punching a hole in your DMZ, you could expose your Biztalk services to outside world. I have been involved in complex configurations in ISA reverse proxy to expose Biztalk services to outside world. But using "Appfabric Connect for Services" , all these complex configurations can be eliminated. Moreover, the ACS (Access Control Services) that is part of Azure Appfabric allows creating your own plug-in security framework.
Monday, November 29, 2010
Integrating Biztalk with Mobile CE device
One of my recent projects involved developing Biztalk services to be consumed by Windows CE mobile devices. I got a chance to work with compact Microsoft framework. In an ideal world, one would expose Biztalk as WCF service and use advanced feature set to integrate the services with the mobile client using compact framework. There is a whole set of compact power tools with own svc generating utility that matches svcutil.exe of .net framework world. Compact framework svcutil may work well with pure WCF kind of services (not tested though) but it will not work with Biztalk services that are exposed as WCF using WCF publishing wizard. It seems there is a bug in the svc util tool for compact framework and the only other option is to consume exposed WCF as a webservice from the client side. This can be done by simply using Add Web Reference option in the mobile client project. Doing this will generate requisite client side proxy objects to talk with the exposed Biztalk service. Service side is to be exposed as WCF with basic-http binding to be consumed as a web service from mobile client. There is one caveat to this approach though. While using a SSL at transport level, it was observed that the client could not pass the request to the service hosted inside the corporate domain from a client situated on WAN (internet). Everything would work fine for calls made within the LAN though. The key difference between LAN and WAN scenarios was the use of reverse proxy ISA. Client requests would have to be routed through ISA for WAN scenarios whereas in LAN scenario ISA will be automatically by passed. This issue could be circumvented by exposing Biztalk as ASMX service (instead of WCF) and using SOAP adapter. Apparently, the security information that is carried over from client through ISA to Biztalk is carried in the envelope part of the SOAP message over the wire. It is possible that the way this security information is formatted in a service exposed as WCF v/s the one exposed as ASMX service is different. That could possibly explain why the client call will work in WAN scenario for ASMX type service and not work for WCF type service.
Tuesday, September 28, 2010
Batching Non-EDI received documents
EDI Batching in Biztalk is done using Batching orchestration that is shipped with Biztalk. This batching orchestration is directly binded with MessageBox and picks up message with EDI.ToBeBatched=True. This flag is set when the message is received using edi receive pipeline. There is a component called "BatchMarker" in the receive pipeline that promotes and sets "EDI.ToBeBatched=True".
In scenario when the incoming message is a Non-EDI type (i.e a Positional Flat file), we have two options to promote the context properties that are required for Batching orchestration to work correctly. First option is to use Orchestration and second is to use a custom pipeline. In this example, I will demonstrate how to use an orchestration:
1. Create an orchestration that takes the Flat File message as input message
2. Create a Outbound Msg (Msgout) representing EDI schema
3. Add a map that does FF-->EDI conversion.
4. Create a correlation set containing 3 EDI context properites. Set these 3 propeties inside an expression shape within the context of a constuct block.
EDI834_Out(EDI.ToBeBatched)=true;
EDI834_Out(EDI.BatchId)=1; //get this ID from "Parties"
EDI834_Out(EDI.EncodingType)=0;// 0 for X12; 1 FOR EDIFACT
5. Initialize the correlation set in send port. This is the key step to promote the 3 context properties else you may end up "writing" the properties and not promoting them.
6. Bind the Orchestration Send Port directly to MessageBox
7. Create a Send Port that Filters "EDI.ToBeBatched=False". You may further differentiate by adding filter for BatchID.
8.Deploy the orchestation and start the send port.
Saturday, September 04, 2010
Modifying Biztalk EDI Schemas
There are times when standard Biztalk EDI schemas need to be expanded to include additional validations. It is a 2 step process.
1. Modify the relevant EDI schema and preferably modify the namespace to differentiate it from standard schema. Deploy it.
2. Go To-->Biztalk Admin Console-->Parties-->Select Partner--> Right Click-->EDI Properties-->Click on "Validation and ACK"-->Check "Extended Validation" (Image below)
1. Modify the relevant EDI schema and preferably modify the namespace to differentiate it from standard schema. Deploy it.
2. Go To-->Biztalk Admin Console-->Parties-->Select Partner--> Right Click-->EDI Properties-->Click on "Validation and ACK"-->Check "Extended Validation" (Image below)

Checking "Extended Validation" tells Biztalk Engine to validate against the custom schema validations. This is in addition to standard EDI schema validations that come out of box.
Friday, August 27, 2010
Extending VPC hard drive
It has been a while since I last blogged. During this period, lot of things have happened in my life. We were blessed with twins and I took a new role with a new company. A role that lets me focus on integration more deeply and also puts me more closer to my clients. Recently, I completed a POC integrating Mobile Windows Devices with Biztalk. It was an exciting experience. No, this blog is not about Mobile integration. This is about something that we face a lot while using VPC images. Well, sooner or later we all will run out of C drive space on our VPC. Yes, it is straight forward to add a new hard drive and name it anything (say D). But that still does not do anything to existing C drive space. There are some programs that by default install on C drive and for these programs C drive should have enough space. There is a way t0 install programs that are looking for C drive to a D drive for example. This post is not talking about that. This post will help to extend existing C drive without using paid softwares like Partition Magic. I actually used a free software to achieve this. Below are the steps:
1. Add a new hard drive (.vhd file) to VPC of desired size but more than the existing hard drive (.vhd drive) that needs to be extended. Call this New partition D:
2. Use DriveImageXML a free software to create an image of existing hard drive (C:)
3. Restore the created image on to (D:)
4. shut down the VPC and remove the original drive C and keep only drive D:
5. Fire it up, you may get issues in booting up the new drive. Use http://www.runtime.org/driveimage_faq.htm. Go to section:
I restored my boot drive, why does it not boot?
and follow Fix Manually section.
6. This should boot up the machine with new hard drive D:. But you may end up having a blank desktop and no programs will work. This is because they all were installed in drive C and the new drive being used is D.
7. To fix this use: http://support.microsoft.com/kb/223188
Subscribe to:
Posts (Atom)

_511.gif)
_530.gif)
