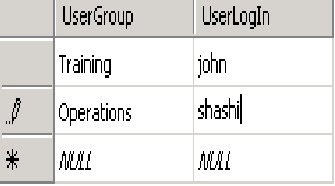
This is what you do:
1) Create a table and name it "RulesGroup". Add two columns : UserLogIn and UserGroup

2) In the infopath form create two text box control: UserName and UserGroup
3) Create a secondary datasource and configure it to receive data from SQL database. Use the wizard to point to the correct table.
4) In the infopath form: Use infopath function username() to populate UserName text box.
Map the UserGroup text box with following Xpath:
xdXDocument:GetDOM("RolesGroup")/dfs:myFields/dfs:dataFields/d:RolesGroup[@UserLogIn = "shashi"]/@UserGroup
PS: XML generated by the wizard marks the 2 user defined columns as "attributes". So there is need to user @ in Xpath expression.
In our case if UserName is "shashi" the UserGroup will be "Operations".
New users and Groups can be added in DB as required and accordingly Infopath Views can be programmed based on Groups.
Remember: While using form services to host infopath form, additional requirement will be creating a new Univeral Data Connection(UDC) file in Data Connection Library under the site collection. This UDC file maps the connection details between infopath form and SQL service. SQL server can't really authenticate the user name being passed directly from the infopath form. The user name comes as "" (blank). One way of getting around is to use proxy user name and password in case the user name is blank. But this will compromise security in Big Way. Use of UDC file helps in this regard. Also, it allows you set up custom User Groups based on User Names. These user groups can be then used to limit access to certain views as explained before in this article.

_511.gif)
_530.gif)

No comments:
Post a Comment