So, I installed Biztalk 2010 on Win2008 server with SQL server 2008 R2 on a 32 bit machine. Biztalk configuration worked smoothly as one would expect it to until the wizard tried to enable BAM portal. Biztalk configuration wizard threw an error saying "Default Web Site can't be validated". I did some research and found that almost everyone that had this error got it fixed by installing "IIS6 compatibility" role on the Server. But in my case, this role was already installed. But just to be sure, I uninstalled it--> restarted the server and installed it back. Only to find that it did not make any difference!
I tried hacking my way by physically creating BAM application on the IIS but did not work either. Since BAM is a pre-compiled version, I could not debug it as I would do in an asp.net web application. Then, I thought of creating a new website called "BAM" at the same level as the "Default Website" but on a different port (not 80). In my case, I used port 81. I ran the Biztalk Configuration wizard, pointed it to "BAM" site instead of "Default WebSite" and it worked!!
Later, I did some research and found out that this is a "bug" or a "known behavior" with Biztalk 2010 installation. It seems creating a new site for BAM is generally accepted solution.
Check out :http://social.msdn.microsoft.com/Forums/en/biztalkgeneral/thread/ef650460-c219-4b34-bc7a-41bb7e75ec81
I would like to hear from others who faced/or not faced same issue.
Thursday, December 30, 2010


Monday, December 27, 2010
Biztalk and CEP (Complex Event Processing)
For people interested in integrating CEP with Biztalk, check out the white paper by Jesus Rodriguez at :
http://www.microsoft.com/downloads/en/details.aspx?FamilyID=6c1da607-4785-4668-a274-6898c38ea603
StreamInsight is part of SQL 2008R2. Do some reading on StreamInsight before checking out this paper.
This paper is very conceptual and does not provide any code snippets. If you are looking for some code samples, then use the samples that come with StreamInsight download and extend them.
http://www.microsoft.com/downloads/en/details.aspx?FamilyID=6c1da607-4785-4668-a274-6898c38ea603
StreamInsight is part of SQL 2008R2. Do some reading on StreamInsight before checking out this paper.
This paper is very conceptual and does not provide any code snippets. If you are looking for some code samples, then use the samples that come with StreamInsight download and extend them.
Monday, December 20, 2010
Appfabric Connect Feature on Biztalk 2010
When Dublin (now Windows Server Appfaric) was close to being released, there was lot of talk around the speculative demise of Biztalk. Some of the key differentiators identified at that time were Mapper tool and ability to resume message flow using persistence data store. At that time, I wrote that it will be matter of time that these differentiators between Biztalk and Dublin will fade away (check the comment section of http://geekswithblogs.net/cyoung/archive/2008/10/15/125848.aspx). Current Avatar of Dublin aka WS Appfabric , provides the ability to persist data and supports resumption of messages. “AppFabric Connect” feature, that is part of Biztalk 2010 installation, exposes Biztalk mapper and LOB directly. So to be used with workflows, that can then be hosted on Windows Server Appfabric which in turn is part of IIS. Light weight applications does not need heavy weight Biztalk database anymore. Low latency scenarios can now easily be constructed using IIS hosting using Dublin.
Since this feature is part of Biztalk 2010 installation, Biztalk license is needed to use this feature. In future this can and will change. It will then be possible to create custom WF that can be persisted to a DB and exposed as WCF endpoints, while mapping .net types using Biztalk with same set of mapping functoids that are part of Biztalk world. And all of this will be free!
Since this feature is part of Biztalk 2010 installation, Biztalk license is needed to use this feature. In future this can and will change. It will then be possible to create custom WF that can be persisted to a DB and exposed as WCF endpoints, while mapping .net types using Biztalk with same set of mapping functoids that are part of Biztalk world. And all of this will be free!
Thursday, December 16, 2010
Little trick....that will help you long way
During the process of creating cloud project using VStudio, don't forget to mark external "reference" assemblies as "Copy Local =True". If this is not done, your application will run fine on your local cloud emulator but throw an "asp.net application error" when executed on the cloud. Every dll that is referenced, other than the default dlls, that are part of cloud project, should have property "copy local = true". When Visual Studio creates deployment package for cloud, it looks for this property. It adds all the dlls with "copy local = true" in the package and when the solution is deployed on the cloud, these additional dlls are deployed on the cloud too. In the absence of these dlls, your cloud application will throw “asp.net application error”.
Tuesday, December 14, 2010
Biztalk and the Cloud
I was in NY city on Dec 1 for the Azure Firestarter event at the Microsoft Office. It was a nice overview of Azure. For past year or so, I have been thinking of getting my hands dirty with this technology. Between work and family, never really got a chance to do so. But this time, after the event I promised myself to actually put what I learnt into practice. Moreover so, because the free registration to Azure portal would expire in few weeks time.
So, I came up with a simple scenario.
1. Expose a CreditScore service using Biztalk within a firewall.
2. Publish this Biztalk Orchestration as WCF to Cloud Endpoint using WCF publishing
wizard
3. Use a simple windows client application to send a message and receive a reply from this Biztalk service exposed within firewall.
Step 1:
Create a two way Biztalk Orchestration that accepts an xml message(First Name, Last Name, SSN) and returns a message (Credit Score and Comments).
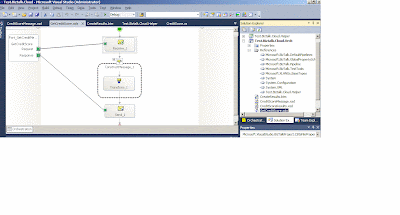
(Image 1)
Step 2.
Publish this Orchestration as the cloud endpoint.
Pre-Requisite:
1. Biztalk 2010
2. Windows AppFabric SDK 1.0
3. Windows Azure AppFabric Account to create the URL of cloud Endpoint (Free, if you have MSDN subscription)
4. Biztalk 2010 adapter pack
For details checkout : support.microsoft.com/kb/2449478
Step 2. Create a windows client to test this Biztalk service using endpoint exposed in the cloud.
Pre-Requisite for the client machine:
1. Visual Studio(2008 sp1 or 2010)
2. Azure AppFabric SDK 1.0 (to get NetTcpRelayBinding and TransportClientEndpointBehavior).
a) Open a "Windows Form Application" Project
"C:\Program Files\Windows Azure AppFabric SDK\V1.0\Assemblies\NET3.5\Microsoft.ServiceBus.dll"
c)Add Service Reference point to the URL exposed in the cloud : Sample URL:
shashiraina-demo.servicebus.windows.net/Test.Biztalk.Cloud.Orch/. This namespace in URL is created using AppFabric Account. (Image below)
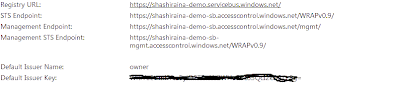 (Image 2)
d) Use the proxy to generate client side objects. I used code instead of config file because, I was not able to get "TransportClientEndpointBehavior" and "NetTcpRelayBinding" to show up in Config file. This may be because I was just using a Windows Application as test client instead of "cloud" supported client. With code, I could easily use the ServiceBus namespace and get it working.
Sample client code is below:
GetCreditScore.GetCreditScoreRequest req = new GetCreditScoreRequest();
GetCreditScore.GetCreditScoreResponse res = new GetCreditScoreResponse();
NetTcpRelayBinding tcpRelayBinding = new NetTcpRelayBinding();
TransportClientEndpointBehavior clientEndBeh = new TransportClientEndpointBehavior();
clientEndBeh.CredentialType = TransportClientCredentialType.SharedSecret;
clientEndBeh.Credentials.SharedSecret.IssuerName = "owner";
clientEndBeh.Credentials.SharedSecret.IssuerSecret = "Extract this from Appfabric Portal";// (it will look something like the crossed out section in the Image 2" )
EndpointAddress endpoint = new EndpointAddress("sb://shashiraina-demo.servicebus.windows.net/Test.Biztalk.Cloud.Orch/WcfService_Test_Biztalk_Cloud_Orch.svc");
WcfService_Test_Biztalk_Cloud_OrchClient client = new WcfService_Test_Biztalk_Cloud_OrchClient(tcpRelayBinding, endpoint);
client.Endpoint.Behaviors.Add(clientEndBeh);
req.Score = new Score(); ;
req.Score.FirstName = "Shashi";
req.Score.LastName = "Raina";
req.Score.SSN = "123-234-2323";
res.Root = new Root();
res.Root = client.GetCreditScore(req.Score);
Response from the service is below: (Go Ahead and tried it out from your machine)!
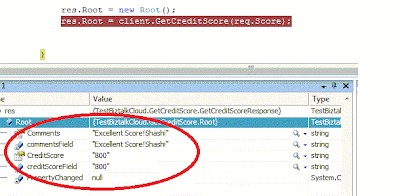
Image 3
So, without punching a hole in your DMZ, you could expose your Biztalk services to outside world. I have been involved in complex configurations in ISA reverse proxy to expose Biztalk services to outside world. But using "Appfabric Connect for Services" , all these complex configurations can be eliminated. Moreover, the ACS (Access Control Services) that is part of Azure Appfabric allows creating your own plug-in security framework.
So, I came up with a simple scenario.
1. Expose a CreditScore service using Biztalk within a firewall.
2. Publish this Biztalk Orchestration as WCF to Cloud Endpoint using WCF publishing
wizard
3. Use a simple windows client application to send a message and receive a reply from this Biztalk service exposed within firewall.
Step 1:
Create a two way Biztalk Orchestration that accepts an xml message(First Name, Last Name, SSN) and returns a message (Credit Score and Comments).

(Image 1)
Step 2.
Publish this Orchestration as the cloud endpoint.
Pre-Requisite:
1. Biztalk 2010
2. Windows AppFabric SDK 1.0
3. Windows Azure AppFabric Account to create the URL of cloud Endpoint (Free, if you have MSDN subscription)
4. Biztalk 2010 adapter pack
For details checkout : support.microsoft.com/kb/2449478
Step 2. Create a windows client to test this Biztalk service using endpoint exposed in the cloud.
Pre-Requisite for the client machine:
1. Visual Studio(2008 sp1 or 2010)
2. Azure AppFabric SDK 1.0 (to get NetTcpRelayBinding and TransportClientEndpointBehavior).
a) Open a "Windows Form Application" Project
b) Add Reference to "Microsoft.ServiceBus.dll" from location
"C:\Program Files\Windows Azure AppFabric SDK\V1.0\Assemblies\NET3.5\Microsoft.ServiceBus.dll"
c)Add Service Reference point to the URL exposed in the cloud : Sample URL:
shashiraina-demo.servicebus.windows.net/Test.Biztalk.Cloud.Orch/. This namespace in URL is created using AppFabric Account. (Image below)
(Image 2)d) Use the proxy to generate client side objects. I used code instead of config file because, I was not able to get "TransportClientEndpointBehavior" and "NetTcpRelayBinding" to show up in Config file. This may be because I was just using a Windows Application as test client instead of "cloud" supported client. With code, I could easily use the ServiceBus namespace and get it working.
Sample client code is below:
GetCreditScore.GetCreditScoreRequest req = new GetCreditScoreRequest();
GetCreditScore.GetCreditScoreResponse res = new GetCreditScoreResponse();
NetTcpRelayBinding tcpRelayBinding = new NetTcpRelayBinding();
TransportClientEndpointBehavior clientEndBeh = new TransportClientEndpointBehavior();
clientEndBeh.CredentialType = TransportClientCredentialType.SharedSecret;
clientEndBeh.Credentials.SharedSecret.IssuerName = "owner";
clientEndBeh.Credentials.SharedSecret.IssuerSecret = "Extract this from Appfabric Portal";// (it will look something like the crossed out section in the Image 2" )
EndpointAddress endpoint = new EndpointAddress("sb://shashiraina-demo.servicebus.windows.net/Test.Biztalk.Cloud.Orch/WcfService_Test_Biztalk_Cloud_Orch.svc");
WcfService_Test_Biztalk_Cloud_OrchClient client = new WcfService_Test_Biztalk_Cloud_OrchClient(tcpRelayBinding, endpoint);
client.Endpoint.Behaviors.Add(clientEndBeh);
req.Score = new Score(); ;
req.Score.FirstName = "Shashi";
req.Score.LastName = "Raina";
req.Score.SSN = "123-234-2323";
res.Root = new Root();
res.Root = client.GetCreditScore(req.Score);
Response from the service is below: (Go Ahead and tried it out from your machine)!
Image 3
So, without punching a hole in your DMZ, you could expose your Biztalk services to outside world. I have been involved in complex configurations in ISA reverse proxy to expose Biztalk services to outside world. But using "Appfabric Connect for Services" , all these complex configurations can be eliminated. Moreover, the ACS (Access Control Services) that is part of Azure Appfabric allows creating your own plug-in security framework.
Monday, November 29, 2010
Integrating Biztalk with Mobile CE device
One of my recent projects involved developing Biztalk services to be consumed by Windows CE mobile devices. I got a chance to work with compact Microsoft framework. In an ideal world, one would expose Biztalk as WCF service and use advanced feature set to integrate the services with the mobile client using compact framework. There is a whole set of compact power tools with own svc generating utility that matches svcutil.exe of .net framework world. Compact framework svcutil may work well with pure WCF kind of services (not tested though) but it will not work with Biztalk services that are exposed as WCF using WCF publishing wizard. It seems there is a bug in the svc util tool for compact framework and the only other option is to consume exposed WCF as a webservice from the client side. This can be done by simply using Add Web Reference option in the mobile client project. Doing this will generate requisite client side proxy objects to talk with the exposed Biztalk service. Service side is to be exposed as WCF with basic-http binding to be consumed as a web service from mobile client. There is one caveat to this approach though. While using a SSL at transport level, it was observed that the client could not pass the request to the service hosted inside the corporate domain from a client situated on WAN (internet). Everything would work fine for calls made within the LAN though. The key difference between LAN and WAN scenarios was the use of reverse proxy ISA. Client requests would have to be routed through ISA for WAN scenarios whereas in LAN scenario ISA will be automatically by passed. This issue could be circumvented by exposing Biztalk as ASMX service (instead of WCF) and using SOAP adapter. Apparently, the security information that is carried over from client through ISA to Biztalk is carried in the envelope part of the SOAP message over the wire. It is possible that the way this security information is formatted in a service exposed as WCF v/s the one exposed as ASMX service is different. That could possibly explain why the client call will work in WAN scenario for ASMX type service and not work for WCF type service.
Tuesday, September 28, 2010
Batching Non-EDI received documents
EDI Batching in Biztalk is done using Batching orchestration that is shipped with Biztalk. This batching orchestration is directly binded with MessageBox and picks up message with EDI.ToBeBatched=True. This flag is set when the message is received using edi receive pipeline. There is a component called "BatchMarker" in the receive pipeline that promotes and sets "EDI.ToBeBatched=True".
In scenario when the incoming message is a Non-EDI type (i.e a Positional Flat file), we have two options to promote the context properties that are required for Batching orchestration to work correctly. First option is to use Orchestration and second is to use a custom pipeline. In this example, I will demonstrate how to use an orchestration:
1. Create an orchestration that takes the Flat File message as input message
2. Create a Outbound Msg (Msgout) representing EDI schema
3. Add a map that does FF-->EDI conversion.
4. Create a correlation set containing 3 EDI context properites. Set these 3 propeties inside an expression shape within the context of a constuct block.
EDI834_Out(EDI.ToBeBatched)=true;
EDI834_Out(EDI.BatchId)=1; //get this ID from "Parties"
EDI834_Out(EDI.EncodingType)=0;// 0 for X12; 1 FOR EDIFACT
5. Initialize the correlation set in send port. This is the key step to promote the 3 context properties else you may end up "writing" the properties and not promoting them.
6. Bind the Orchestration Send Port directly to MessageBox
7. Create a Send Port that Filters "EDI.ToBeBatched=False". You may further differentiate by adding filter for BatchID.
8.Deploy the orchestation and start the send port.
In scenario when the incoming message is a Non-EDI type (i.e a Positional Flat file), we have two options to promote the context properties that are required for Batching orchestration to work correctly. First option is to use Orchestration and second is to use a custom pipeline. In this example, I will demonstrate how to use an orchestration:
1. Create an orchestration that takes the Flat File message as input message
2. Create a Outbound Msg (Msgout) representing EDI schema
3. Add a map that does FF-->EDI conversion.
4. Create a correlation set containing 3 EDI context properites. Set these 3 propeties inside an expression shape within the context of a constuct block.
EDI834_Out(EDI.ToBeBatched)=true;
EDI834_Out(EDI.BatchId)=1; //get this ID from "Parties"
EDI834_Out(EDI.EncodingType)=0;// 0 for X12; 1 FOR EDIFACT
5. Initialize the correlation set in send port. This is the key step to promote the 3 context properties else you may end up "writing" the properties and not promoting them.
6. Bind the Orchestration Send Port directly to MessageBox
7. Create a Send Port that Filters "EDI.ToBeBatched=False". You may further differentiate by adding filter for BatchID.
8.Deploy the orchestation and start the send port.
Saturday, September 04, 2010
Modifying Biztalk EDI Schemas
There are times when standard Biztalk EDI schemas need to be expanded to include additional validations. It is a 2 step process.
1. Modify the relevant EDI schema and preferably modify the namespace to differentiate it from standard schema. Deploy it.
2. Go To-->Biztalk Admin Console-->Parties-->Select Partner--> Right Click-->EDI Properties-->Click on "Validation and ACK"-->Check "Extended Validation" (Image below)
1. Modify the relevant EDI schema and preferably modify the namespace to differentiate it from standard schema. Deploy it.
2. Go To-->Biztalk Admin Console-->Parties-->Select Partner--> Right Click-->EDI Properties-->Click on "Validation and ACK"-->Check "Extended Validation" (Image below)

Checking "Extended Validation" tells Biztalk Engine to validate against the custom schema validations. This is in addition to standard EDI schema validations that come out of box.
Friday, August 27, 2010
Extending VPC hard drive
It has been a while since I last blogged. During this period, lot of things have happened in my life. We were blessed with twins and I took a new role with a new company. A role that lets me focus on integration more deeply and also puts me more closer to my clients. Recently, I completed a POC integrating Mobile Windows Devices with Biztalk. It was an exciting experience. No, this blog is not about Mobile integration. This is about something that we face a lot while using VPC images. Well, sooner or later we all will run out of C drive space on our VPC. Yes, it is straight forward to add a new hard drive and name it anything (say D). But that still does not do anything to existing C drive space. There are some programs that by default install on C drive and for these programs C drive should have enough space. There is a way t0 install programs that are looking for C drive to a D drive for example. This post is not talking about that. This post will help to extend existing C drive without using paid softwares like Partition Magic. I actually used a free software to achieve this. Below are the steps:
1. Add a new hard drive (.vhd file) to VPC of desired size but more than the existing hard drive (.vhd drive) that needs to be extended. Call this New partition D:
2. Use DriveImageXML a free software to create an image of existing hard drive (C:)
3. Restore the created image on to (D:)
4. shut down the VPC and remove the original drive C and keep only drive D:
5. Fire it up, you may get issues in booting up the new drive. Use http://www.runtime.org/driveimage_faq.htm. Go to section:
I restored my boot drive, why does it not boot?
and follow Fix Manually section.
6. This should boot up the machine with new hard drive D:. But you may end up having a blank desktop and no programs will work. This is because they all were installed in drive C and the new drive being used is D.
7. To fix this use: http://support.microsoft.com/kb/223188
1. Add a new hard drive (.vhd file) to VPC of desired size but more than the existing hard drive (.vhd drive) that needs to be extended. Call this New partition D:
2. Use DriveImageXML a free software to create an image of existing hard drive (C:)
3. Restore the created image on to (D:)
4. shut down the VPC and remove the original drive C and keep only drive D:
5. Fire it up, you may get issues in booting up the new drive. Use http://www.runtime.org/driveimage_faq.htm. Go to section:
I restored my boot drive, why does it not boot?
and follow Fix Manually section.
6. This should boot up the machine with new hard drive D:. But you may end up having a blank desktop and no programs will work. This is because they all were installed in drive C and the new drive being used is D.
7. To fix this use: http://support.microsoft.com/kb/223188
Saturday, December 27, 2008
Using Biztalk in transaction mode with a WCF client
While trying to use a WCF client to send a message to Biztalk as a transaction, I got the following error:
"Cannot access a disposed object. Object name: 'TransactionScope' "
On investigation, I found that this can happen when:
"Cannot access a disposed object. Object name: 'TransactionScope' "
On investigation, I found that this can happen when:
- Recieve port/location does not have a corresponding subscription (orchestration / send port) created.
- Send Port is created but not enlisted. This is same as no subscription found in database.
When enable transactions check box is clicked while configuring receive location as shown below:

Behind the scenes, a transaction scope object is created that will attach itself to incoming message sent from a client and form a one continious transaction involving MSDTC. This enables WCF client to control the whole transaction involving Biztalk. Client can use "commit" and "rollback" commands to commit and rollback message in Biztalk messagebox database. Very powerful!
Reason:
At core, Biztalk works on pub-sub mechanism. In absence of any subscription, receive location can't really participate in transaction and create a transaction object. Hence the error is raised "cannot access a dispose object" (transaction object)
Solution is simple: Create a subscription for the receive port/location in form of a send port or an orchestration.
Sunday, October 05, 2008
Using SAP Biztalk 2006 R2 WCF adapter
Work involved in configuring SAP adapter can be divided into 2 steps. First step involves work done by Biztalk team and second step involves work done by SAP team.
Step 1: BIZTALK TEAM
Biztalk side needs to define a Program ID. SAP adapter then registers this Program ID to the SAP gateway defined in the URL. This Program ID then needs to be registered from SAP side. SAP admin should follow “Performing Tasks Using the SAP GUI for Specific SAP Adapter Scenarios” section of SAPAdapter.chm file.
Program ID will be unique per listener else SAP will send the document to random listeners. Each Receive location will be tied to a unique Program ID for an environment. Example: If same receive location is being used in 3 environments (DEV, QA and Prod) then 3 Program IDS are required to be set up for that single receive location. RFC checks the connection between SAP and biztalk using program id registered channel. SAP then sends IDOC to biztalk. Biztalk accepts this IDoc and processes it.
Configure recv location as shown:
Step 1: BIZTALK TEAM
Biztalk side needs to define a Program ID. SAP adapter then registers this Program ID to the SAP gateway defined in the URL. This Program ID then needs to be registered from SAP side. SAP admin should follow “Performing Tasks Using the SAP GUI for Specific SAP Adapter Scenarios” section of SAPAdapter.chm file.
Program ID will be unique per listener else SAP will send the document to random listeners. Each Receive location will be tied to a unique Program ID for an environment. Example: If same receive location is being used in 3 environments (DEV, QA and Prod) then 3 Program IDS are required to be set up for that single receive location. RFC checks the connection between SAP and biztalk using program id registered channel. SAP then sends IDOC to biztalk. Biztalk accepts this IDoc and processes it.
Configure recv location as shown:
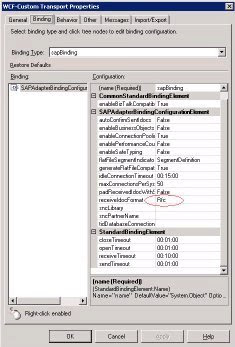
Configure following URL at recv location
sap://CLIENT=[client ID] ;LANG=EN;@a/[servername]/[system ID]
?ListenerGwHost=[hostname]&ListenerGwServ=[gateway service name] &ListenerProgramId=[Program ID}
SAP team should supply with the above variables.
Do not forget to ask for user name and password to configure screen below:
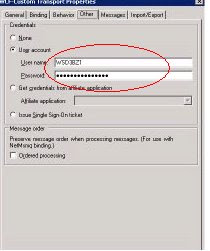
Step 2: SAP TEAM
SAP team to supply:
1. client ID
2. servername
3. system ID
4. hostname
5. gateway service name
6. User ID
7. Password
Thursday, April 24, 2008
Configuring BAM and WSS adapter on 64 bit machine
BAM and WSS adapter have conflicting requirements for 64 bit machine. BAM needs 32 bit IIS and WSS 3.0 needs 64 bit IIS. To make matters further complex, it is not possible to host 32 bit IIS and 64 bit IIS on same 64 bit machine. So how can Biztalk communicate with a MOSS server running on 64 bit machine? Following configuration makes this possible:
1) Enable 32 bit IIS on the 64 bit machine by running following command:
cscript %SystemDrive%\inetpub\AdminScripts\adsutil.vbs set w3svc/AppPools/Enable32bitAppOnWin64 1
(1 means “true” and 0 means “false”)
2) Now, IIS is 32 bit and follow standard BAM configuration steps.
3) Install WSS 2.0 SP2 on the Biztalk machine to enable configuring WSS adapter. Also, configure WSS adapter on MOSS machine that hosts WSS 3.0
4) To install WSS 2.0, register ASP.Net 2.0 (32 bit version) from “Windows\Framework” folder by running aspnet_regiis.exe –i
5) Download and install WSS 2.0 SP2
6) Install WSS 2.0 in server farm mode and then create and extend the website. This website will host the WSS adapter.
7) When installing WSS 2.0 on clustered machine, use option “Join existing …”
8) Run Biztalk Configuration wizard and configure WSS adapter on Biztalk machine.
9) Run Biztalk Configuration Wizard on MOSS machine and configure adapter there.
10) Make the AppPool Account that is running WSS 2.0 website a member of SharePoint Group and SharePoint Site Collection on MOSS machine hosting WSS 3.0.
When WSS is configured, it creates BTSharePointAdapterWS. WSS adapter uses this web service to communicate with MOSS form libraries, lists and document libraries. This service need not be running on Biztalk machine but it should be running on MOSS machine for proper communication back and forth.
Tuesday, January 08, 2008
Cross Updating Windows Workflow Tasks in Parallel Activity
Parallel activities in Windows Workflow are independent as the name suggests. How could we then update Task A from Task B when Task A and Task B are running in parallel? After spending 1 hour, I figured it out.
1) Use "Update Task" shape for updating Task A and drop it in the "parallel" arm of Task B. The position of this task could be above the "Complete Task" or as required. But it should be under the "create task" shape for Task B.
2) Here is the imporant part. Set the correlation token as the correlation token used for Task A even though this task is under Task B related tasks. This correlation token will direct the update task to the correct task (Task A in our case)
3) Bind the TaskID to existing Task ID for Task A.
3) Use syntax "TaskProperties.ExtendedProperties["NameOfInfopathField_inTaskA_thatis_to_be_updated"]="desiredvalue"
Important:
Parallel workflows in WF are actually processed in a sequence. Left branch is processed first and then control moves towards the right . While cross updating tasks, correlation ID is the key that ties the different tasks together. For tasks on the extreme right arm, all the correlation IDs in the workflow are available. But this selection reduces are we move towards left. In order to update a task on the right side of a given task, the correlation ID will not be available from the work flow design view. But going to deign code file(*.designer.cs / *.designer.vb) gives the flexibility to link the correlation ID with the task that is to be updated.
i.e.
this.UpdateFromTaskOnLeftSide =CorrelationToken (this will be token for the task on the right side that is being updated from left side).
1) Use "Update Task" shape for updating Task A and drop it in the "parallel" arm of Task B. The position of this task could be above the "Complete Task" or as required. But it should be under the "create task" shape for Task B.
2) Here is the imporant part. Set the correlation token as the correlation token used for Task A even though this task is under Task B related tasks. This correlation token will direct the update task to the correct task (Task A in our case)
3) Bind the TaskID to existing Task ID for Task A.
3) Use syntax "TaskProperties.ExtendedProperties["NameOfInfopathField_inTaskA_thatis_to_be_updated"]="desiredvalue"
Important:
Parallel workflows in WF are actually processed in a sequence. Left branch is processed first and then control moves towards the right . While cross updating tasks, correlation ID is the key that ties the different tasks together. For tasks on the extreme right arm, all the correlation IDs in the workflow are available. But this selection reduces are we move towards left. In order to update a task on the right side of a given task, the correlation ID will not be available from the work flow design view. But going to deign code file(*.designer.cs / *.designer.vb) gives the flexibility to link the correlation ID with the task that is to be updated.
i.e.
this.UpdateFromTaskOnLeftSide =CorrelationToken (this will be token for the task on the right side that is being updated from left side).
Monday, January 07, 2008
Accessing SQL data from Infopath Form Control
A control in infopath form can be configured to receive data from XML, WebService, SharePoint List and SQL database (only). In this article I will focus on using SQL database as secondary datasource. I used SQL database to hold values for login in one column and second column gave the user groups for that LogIn. I used these Groups to control the views that a user can access. For Example: You could add rule to restrict an IT user to view data for IT only and not for Finance or Marketing.
This is what you do:
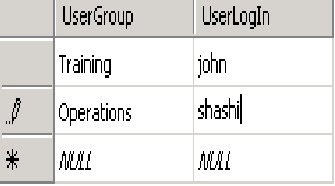
1) Create a table and name it "RulesGroup". Add two columns : UserLogIn and UserGroup
2) In the infopath form create two text box control: UserName and UserGroup
3) Create a secondary datasource and configure it to receive data from SQL database. Use the wizard to point to the correct table.
4) In the infopath form: Use infopath function username() to populate UserName text box.
Map the UserGroup text box with following Xpath:
xdXDocument:GetDOM("RolesGroup")/dfs:myFields/dfs:dataFields/d:RolesGroup[@UserLogIn = "shashi"]/@UserGroup
PS: XML generated by the wizard marks the 2 user defined columns as "attributes". So there is need to user @ in Xpath expression.
In our case if UserName is "shashi" the UserGroup will be "Operations".
New users and Groups can be added in DB as required and accordingly Infopath Views can be programmed based on Groups.
Remember: While using form services to host infopath form, additional requirement will be creating a new Univeral Data Connection(UDC) file in Data Connection Library under the site collection. This UDC file maps the connection details between infopath form and SQL service. SQL server can't really authenticate the user name being passed directly from the infopath form. The user name comes as "" (blank). One way of getting around is to use proxy user name and password in case the user name is blank. But this will compromise security in Big Way. Use of UDC file helps in this regard. Also, it allows you set up custom User Groups based on User Names. These user groups can be then used to limit access to certain views as explained before in this article.
This is what you do:
1) Create a table and name it "RulesGroup". Add two columns : UserLogIn and UserGroup

2) In the infopath form create two text box control: UserName and UserGroup
3) Create a secondary datasource and configure it to receive data from SQL database. Use the wizard to point to the correct table.
4) In the infopath form: Use infopath function username() to populate UserName text box.
Map the UserGroup text box with following Xpath:
xdXDocument:GetDOM("RolesGroup")/dfs:myFields/dfs:dataFields/d:RolesGroup[@UserLogIn = "shashi"]/@UserGroup
PS: XML generated by the wizard marks the 2 user defined columns as "attributes". So there is need to user @ in Xpath expression.
In our case if UserName is "shashi" the UserGroup will be "Operations".
New users and Groups can be added in DB as required and accordingly Infopath Views can be programmed based on Groups.
Remember: While using form services to host infopath form, additional requirement will be creating a new Univeral Data Connection(UDC) file in Data Connection Library under the site collection. This UDC file maps the connection details between infopath form and SQL service. SQL server can't really authenticate the user name being passed directly from the infopath form. The user name comes as "" (blank). One way of getting around is to use proxy user name and password in case the user name is blank. But this will compromise security in Big Way. Use of UDC file helps in this regard. Also, it allows you set up custom User Groups based on User Names. These user groups can be then used to limit access to certain views as explained before in this article.
Monday, December 31, 2007
Integrating MOSS, WF and Infopath
I ventured into relatively "unchartered" territory of SharePoint world. I have been working on setting up a a framework involving MOSS, Windows WorkFlow and Infopath 2007. Business requirements are pretty standard. Client wants to set up a business process for "New Hire". When a new hire joins in certain business processes need to be fired. Like creating domain accounts, allocating hardware and setting up the user in different databases. Some of the processes will be executed in series and others in parallel.
Goal is to set up a scalable architecture that can potentially hook up with Biztalk in near future. Essentially we are setting up "Business Process Management (BPM)" system. Recently my company established a partnership with a company (PNM Soft) that is one of the leaders in "BPM" software. I evaluated their software to be in a position to recommend it to my clients. It is a very powerful and easy to use software. Does not require much of coding and even a pure business user can design complex BPM processes using it.
My ongoing work in developing a scalable framework for my client using MOSS and other tools will also help me in determining the value added by the "BPM" software with respect to designing a BPM process from scratch using standard MSFT technologies.
Solution:
1) 2 Infopath forms ( First form is a brower enabled form that is published on "sharepoint", Second Form is infopath Task form that is published on "network"). I tried to get "Single" form to do both. But I ran into problems. Sharepoint won't let me publish the same form as "workflow" attachment and also as "sharepoint" enabled form. The second form is actually what you will call "Task Item" Form. It is one of the 4 forms that Workflow uses.
2) Workflow that is attached to a form library. Users publish the "first" form to the form library that triggers the "Workflow". This work flow is "sharepoint" sequential workflow.A good working demo can be found at:
http://weblog.vb-tech.com/nick/archive/2007/02/25/2207.aspx
Following are some helpful tips:
1) Cloning an infopath to create a second form is not a good practice. Infopath has a unique internal ID that will also copy over to new form and can create issues when both forms are used in a WF set up. I tried using one form as an Initiation form and second as Task Item form but could not get it working. I came across issue in passing parameters from work flow to the "Task Item" form. I am not aware of any workaround. But I think it is a good practice to create forms from scratch. I will not recommend the "schema first" approach for same reasons.
2) Make sure that the "network" published infopath forms (*.xsn) listed under Metadata section of "workflow.xml" (part of WF solution) exists and are under the correct folder location. Delete the references of forms not being used from "workflow.xml". Else you may get error like "Form is closed".
3) If you are using VSTA to code infopath forms. Make sure that the "dll" file is also part of the folder where *.xsn forms are located. Else you may be get an error " Type: InfoPathLocalizedException, Exception Message: The specified form cannot be found". Another thing that is to be kept in mind is use of "FormState" to define global variables. For browser enabled forms, there is need to preserve state across browser sessions. "FormState" helps you do that. The other option is to use workflow to pass the values into the "resource" file that is part of the infopath form. This "resource" file serves as "Secondary" data source and accepts values from Workflow and then updates the Infopath (Task form). I like this option better because using WorkFlow to maintain the state ensures that the "infopath" form is updated only after the workflow is executed. Thus making
sure that "state" the infopath work represents is actually the state that workflow
indicates. There is no need to use "FormState" property in latter case.
Check out the image below:

Note: The order of fields in "secondary" data source schema matches the order in which WorkFlow assign values.
Use "Trusted Security" while publising forms with embedded VSTA code.
PS: VSTA and VSTO carry the same weight when used for "broswer" only forms.
4) Windows Worfklow dll needs to be GACed but the dll for VSTA code is not required to be GACed. But it needs to be copied to the same folder on network where the forms are published.
PS: Suppose you create a infopath form with embedded VSTA code and then you remove the code before "publishing" it. You still need to "copy the dll" file in the correct folder containing .xsn form. Else you will get "Form have been closed" error. I found this hard way!
5) Everytime infopath form is changed it should be republished to the network. Also updated dll should be copied. Unistall/Install the feature. Workflows that are already in progress will be updated with the new changes. Keep this is mind before applying the changes. Accordingly wait for "In Progress" workflows to finish.
6) There is no need to RE GAC the workflow dll if only infopath forms are changed. Also it is important to restart the IIS after GACing any new version updates. Restart ensures that the new changes come in effect.
7) Do not try to change the Unique ID of form by going to "File----> Properties" in design view. It seems that there is more than 1 place where this unique ID is referenced in the form. This is the same ID that is referenced in "workflow.xml" and indicates to the workflow which form should be opened as Task Form, Initiation Form, Association form and Modification
Form.
8) "check box" control in Infopath form can be changed from "Boolean" data type to "Text" data type and can be used to accept updates from workflow and this also gives more flexibility to
program it using VSTA and VSTO.
To Do this:
Go to Design View -----> DataSource-----> Double Click on the "check box control" ----->Following type window will "pop-up"----->Change Date Type from "Boolean" to "String"---> This will enable the icon "Fx" and then click there. Now you can select the value that you want to pass from "Secondary Data Source" . This seconday data source will be configured to receive the XML from workFlow
 Also, double click on "check" box in form view and make the properties for the "check box" look like.
 Now when you pass values of "true" or "false" as string datatype from workflow, the check box will accept them.
9) Use of Initiation form gives easy access the XML data stream that is following into WorkFlow. XML stream can be accessed through workflowProperties.InitiationData. I did not want to use Inititiation form as I wanted to "automatically" start WorkFlow when something new is published or something existing changes in Form Library. To do so you need to use following code in "WorkFlow Activity activated shape"
SPWeb thisWeb = new SPSite(workflowProperties.SiteId).OpenWeb(workflowProperties.WebId);
SPListItem thisItem = thisWeb.Lists[workflowProperties.ListId].GetItemById(workflowProperties.ItemId);
byte[] fileBytes = thisItem.File.OpenBinary();
UTF8Encoding encoding = new UTF8Encoding();
String xmlString;
xmlString = encoding.GetString(fileBytes);
xmlString = xmlString.Trim();
// Desiralization. InitForm is class generated from schema of incoming message
XmlSerializer serializer = new XmlSerializer(typeof(InitForm));
XmlTextReader reader = new XmlTextReader(new System.IO.StringReader(xmlString));
InitForm initform = (InitForm)serializer.Deserialize(reader);
At the end, I concluded that the BPM software is very efficient when it comes to designing pure BPM solutions. MSFT tools are definitely powerful in complex B2B scenario and integration with other systems. But they are "overkill" for simple BPM scenarios.
Goal is to set up a scalable architecture that can potentially hook up with Biztalk in near future. Essentially we are setting up "Business Process Management (BPM)" system. Recently my company established a partnership with a company (PNM Soft) that is one of the leaders in "BPM" software. I evaluated their software to be in a position to recommend it to my clients. It is a very powerful and easy to use software. Does not require much of coding and even a pure business user can design complex BPM processes using it.
My ongoing work in developing a scalable framework for my client using MOSS and other tools will also help me in determining the value added by the "BPM" software with respect to designing a BPM process from scratch using standard MSFT technologies.
Solution:
1) 2 Infopath forms ( First form is a brower enabled form that is published on "sharepoint", Second Form is infopath Task form that is published on "network"). I tried to get "Single" form to do both. But I ran into problems. Sharepoint won't let me publish the same form as "workflow" attachment and also as "sharepoint" enabled form. The second form is actually what you will call "Task Item" Form. It is one of the 4 forms that Workflow uses.
2) Workflow that is attached to a form library. Users publish the "first" form to the form library that triggers the "Workflow". This work flow is "sharepoint" sequential workflow.A good working demo can be found at:
http://weblog.vb-tech.com/nick/archive/2007/02/25/2207.aspx
Following are some helpful tips:
1) Cloning an infopath to create a second form is not a good practice. Infopath has a unique internal ID that will also copy over to new form and can create issues when both forms are used in a WF set up. I tried using one form as an Initiation form and second as Task Item form but could not get it working. I came across issue in passing parameters from work flow to the "Task Item" form. I am not aware of any workaround. But I think it is a good practice to create forms from scratch. I will not recommend the "schema first" approach for same reasons.
2) Make sure that the "network" published infopath forms (*.xsn) listed under Metadata section of "workflow.xml" (part of WF solution) exists and are under the correct folder location. Delete the references of forms not being used from "workflow.xml". Else you may get error like "Form is closed".
3) If you are using VSTA to code infopath forms. Make sure that the "dll" file is also part of the folder where *.xsn forms are located. Else you may be get an error " Type: InfoPathLocalizedException, Exception Message: The specified form cannot be found". Another thing that is to be kept in mind is use of "FormState" to define global variables. For browser enabled forms, there is need to preserve state across browser sessions. "FormState" helps you do that. The other option is to use workflow to pass the values into the "resource" file that is part of the infopath form. This "resource" file serves as "Secondary" data source and accepts values from Workflow and then updates the Infopath (Task form). I like this option better because using WorkFlow to maintain the state ensures that the "infopath" form is updated only after the workflow is executed. Thus making
sure that "state" the infopath work represents is actually the state that workflow
indicates. There is no need to use "FormState" property in latter case.
Example: Suppose user clicks on a check box on "Infopath Task form" indicating that the particular step is complete and workflow should flow to next step. If one preserves this state (of "check box" being clicked") using "FormState" then even if the workflow gives error the "checkbox" will still show as clicked and user will get an impression that the process is completed successfully as "check box" is clicked. But having workflow update this "checkbox" using "Extended Properties" ensures that this check box preserves the right state only after the workflow has done what it was suppose to do.
I noticed that order of populating "secondary data source" from workflow does matter. If the order is not correct the values will not propogate from workflow to secondary data source to Infopath form.Check out the image below:
Note: The order of fields in "secondary" data source schema matches the order in which WorkFlow assign values.
Use "Trusted Security" while publising forms with embedded VSTA code.
PS: VSTA and VSTO carry the same weight when used for "broswer" only forms.
4) Windows Worfklow dll needs to be GACed but the dll for VSTA code is not required to be GACed. But it needs to be copied to the same folder on network where the forms are published.
PS: Suppose you create a infopath form with embedded VSTA code and then you remove the code before "publishing" it. You still need to "copy the dll" file in the correct folder containing .xsn form. Else you will get "Form have been closed" error. I found this hard way!
5) Everytime infopath form is changed it should be republished to the network. Also updated dll should be copied. Unistall/Install the feature. Workflows that are already in progress will be updated with the new changes. Keep this is mind before applying the changes. Accordingly wait for "In Progress" workflows to finish.
6) There is no need to RE GAC the workflow dll if only infopath forms are changed. Also it is important to restart the IIS after GACing any new version updates. Restart ensures that the new changes come in effect.
7) Do not try to change the Unique ID of form by going to "File----> Properties" in design view. It seems that there is more than 1 place where this unique ID is referenced in the form. This is the same ID that is referenced in "workflow.xml" and indicates to the workflow which form should be opened as Task Form, Initiation Form, Association form and Modification
Form.
8) "check box" control in Infopath form can be changed from "Boolean" data type to "Text" data type and can be used to accept updates from workflow and this also gives more flexibility to
program it using VSTA and VSTO.
To Do this:
Go to Design View -----> DataSource-----> Double Click on the "check box control" ----->Following type window will "pop-up"----->Change Date Type from "Boolean" to "String"---> This will enable the icon "Fx" and then click there. Now you can select the value that you want to pass from "Secondary Data Source" . This seconday data source will be configured to receive the XML from workFlow
Also, double click on "check" box in form view and make the properties for the "check box" look like.Now when you pass values of "true" or "false" as string datatype from workflow, the check box will accept them.9) Use of Initiation form gives easy access the XML data stream that is following into WorkFlow. XML stream can be accessed through workflowProperties.InitiationData. I did not want to use Inititiation form as I wanted to "automatically" start WorkFlow when something new is published or something existing changes in Form Library. To do so you need to use following code in "WorkFlow Activity activated shape"
SPWeb thisWeb = new SPSite(workflowProperties.SiteId).OpenWeb(workflowProperties.WebId);
SPListItem thisItem = thisWeb.Lists[workflowProperties.ListId].GetItemById(workflowProperties.ItemId);
byte[] fileBytes = thisItem.File.OpenBinary();
UTF8Encoding encoding = new UTF8Encoding();
String xmlString;
xmlString = encoding.GetString(fileBytes);
xmlString = xmlString.Trim();
// Desiralization. InitForm is class generated from schema of incoming message
XmlSerializer serializer = new XmlSerializer(typeof(InitForm));
XmlTextReader reader = new XmlTextReader(new System.IO.StringReader(xmlString));
InitForm initform = (InitForm)serializer.Deserialize(reader);
At the end, I concluded that the BPM software is very efficient when it comes to designing pure BPM solutions. MSFT tools are definitely powerful in complex B2B scenario and integration with other systems. But they are "overkill" for simple BPM scenarios.
Wednesday, August 29, 2007
Implementing WCF
Why WCF?
WCF aka Windows Communication Foundation services is latest product from MSFT for creating Distributive Applications. Year 2007 has been buzzing with new product releases on a weekly basis. It is sometimes hard to keep track of latest releases. I can speak for myself that I end up missing some new releases now and then. It is tough to keep one eye on client work and another eye on MSFT press releases. Now it has become part of job. Working in consulting sector is a 24/7 job. When you are not working with client, you are scanning different websites looking for bits and bytes on latest product releases and technology trends. I do love my job but sometimes it gets really tough to keep up with the pace of technology changes. Sometimes you have to be like Tiger Woods and chose to leave. If only everyone was as good as him!
Distributive Technologies have become center of turf war for technology companies. Webservices is an important piece in this war. Turf is dotted with companies like Java and also open source products like Tungsten.
WCF is a further enhancement of ASMX webservice released with .Net framework 2.0. WCF is part of .net framework 3.0 version. Version 3.5 is out too in form of beta version. WCF lets users get benefit of ASMX , WCE and messaging services as one product. WCF supports MSMQ, HTTP and TCP protocol. ASMX webservice only supports HTTP. Additional transports can be configured to WCF. WCF also offers configuration editor with GUI for monitoring performance, tracking messages and errors. This tool helps in reducing operation cost with out of box monitoring and tracing of data. Details at the end.
WCF aka Windows Communication Foundation services is latest product from MSFT for creating Distributive Applications. Year 2007 has been buzzing with new product releases on a weekly basis. It is sometimes hard to keep track of latest releases. I can speak for myself that I end up missing some new releases now and then. It is tough to keep one eye on client work and another eye on MSFT press releases. Now it has become part of job. Working in consulting sector is a 24/7 job. When you are not working with client, you are scanning different websites looking for bits and bytes on latest product releases and technology trends. I do love my job but sometimes it gets really tough to keep up with the pace of technology changes. Sometimes you have to be like Tiger Woods and chose to leave. If only everyone was as good as him!
Distributive Technologies have become center of turf war for technology companies. Webservices is an important piece in this war. Turf is dotted with companies like Java and also open source products like Tungsten.
WCF is a further enhancement of ASMX webservice released with .Net framework 2.0. WCF is part of .net framework 3.0 version. Version 3.5 is out too in form of beta version. WCF lets users get benefit of ASMX , WCE and messaging services as one product. WCF supports MSMQ, HTTP and TCP protocol. ASMX webservice only supports HTTP. Additional transports can be configured to WCF. WCF also offers configuration editor with GUI for monitoring performance, tracking messages and errors. This tool helps in reducing operation cost with out of box monitoring and tracing of data. Details at the end.
It is highly flexible and configurable solution but does have some drawbacks as compared to .Net remoting. Especially when it comes to running multiple service host instances under single host. .Net remoting actually lets you add service instances. WCF can be run as self-hosting service, IIS or WAS. While running WCF as self hosting service, check the Task manager window. WCF service will show up as Services.exe. There will be only one instance of this service at one given time. Multiple instances are not supported.

Demo:
Used MSFT base sample, Organized it and added personal notes and updates
1) Create a Blank Solution call WCF
2) Add a Project and Call it “Host”
3) Add a C# library file and call it “Host.cs”
· Add reference to System.ServiceModel.dll
4) Add another Project and call it “Client”
I ) Create WCF Host
5) Define Service Contract
// Define a service contract.
[ServiceContract(Namespace = "http://Microsoft.Demo.WCF")]
public interface IMath
{
[OperationContract]
double Add(double n1, double n2);
}
Attribute “ServiceContract” marks the Interface to carry metadata for WCF.
Attribute “OperationContract” is equivalent to “Public” keyword. Client can access the service.
PS: Since the datatype used in simple we have not explicityly defined “DataContract”. For complex datatyype it is important to define DataContract explicitly. It is also a good practice to keep “ServiceContact” and “DataContract” as separate implementation.
6) Implement the service
Implementing service contract is a rather easy process. Just use a C# (VB) class and implement the service interface. This is the part where the logic behind the service is implemented.
//Implement the service
public class MathService : IMath
{
public double Add(double n1, double n2)
{
double result = n1 + n2;
Console.WriteLine("Return: {0}", result);
return result;
}
7) Create Host for the service
Till now the service is in form of library class. We will need a host to host the service. As mentioned earlier, there are 3 options:
a. Create Self Host
b. Use IIS
c. Use WAS
In this demo we will create our own host because it is easy to Debug. Before we create a host, we need to define the address where the service will reside.
This step will contain following five steps:
d. Create a base address for the service.
e. Create a service host for the service.
f. Add a service endpoint
g. Enable metadata exchange.
h. Open the service host
// Step d
Uri baseAddress = new Uri("http://localhost:8000/DemoWCF/Service");
// Step e
ServiceHost serviceHost = new ServiceHost(typeof(MathService), baseAddress);
try
{
// Step f
serviceHost.AddServiceEndpoint(
typeof(IMath),
new WSHttpBinding(),
"MathService");
// Step g
ServiceMetadataBehavior smb = new ServiceMetadataBehavior();
smb.HttpGetEnabled = true;
serviceHost.Description.Behaviors.Add(smb);
This step is required to run the svcutil command later on to download 2 client files (config and class). Otherwise user may get following error:
“ There was no endpoint listening at http://localhost:8000/DemoWCF/service that could accept the message. This is often caused by an incorrect address or SOAP action. See InnerException, if present, for more details.
The remote server returned an error: (404) Not Found.”
This step is optional if user decides to manually create both client files.
// Step h
serviceHost.Open();
Console.WriteLine("The service is ready.");
Console.WriteLine("Press
Console.WriteLine();
Console.ReadLine();
serviceHost.Close();
II) Create WCF client 8) Run svcutil command to generate client class and config file
C:\Program Files\Microsoft Visual Studio 8\Common7\IDE> svcutil /language:cs /out
:generatedClient.cs http://localhost:8000/DemoWCF/service
2 generated files will be : output.config and generatedClient.cs.
9) Add both of these clients to “Client” Project. The complete solution will look something like the imaage below. Note the added references. Rename them to app.config and MathClient.cs
10) Add the following code to Client.CS
namespace Microsoft.Demo.WCF
{
class Client
{
static void Main()
{
try
{
//Create an EndpointAddress instance for the base address
This Endpoint address should be concatenation of baseAddress variable in Host class and stringaddress paramter in AddEndPoint method of Host class. EndpointAddress epAddress = new EndpointAddress("http://localhost:8000/DemoWCF/Service/MathService");
MathClient client = new MathClient(new WSHttpBinding(), epAddress);
//Call the contract implementation in Host class from Client class.
double value1 = 29;
double value2 = 16.00;
double result = client.Add(value1, value2);
Console.WriteLine("Add({0},{1}) = {2}", value1, value2, result);
//Close WCF client
client.Close();
Console.WriteLine();
Console.WriteLine("Press
Console.ReadLine();
}
This is simple scenario where we have single service contract , single implementation and single endpoint.
Scenario:
A new client comes in and wants to a new service contract called “Subtract”.
Two ways of doing this:
1) Add the new service “Subtract” in existing interface IMath
2) Create a new Interface IMath1 for “Subtract”
Add the new service “Subtract” in existing interface IMath
Most simplest of updates. But it does not gives us seperation between both as it is part of same interface. Implementation is still with same class and same service host and endpoint. Only thing that change is on the client side where the client calls “client.subtract” just like “client.Add” in the demo above.
Create a new Interface IMath1 for “Subtract”
Create a new interface say IMath1 that contains “Subtract”. Create a second class say “MathService1”. We can’t use the same class to implement 2 interfaces under the same namespace, so we will need to create a new class to implement the new interface (service contract). Another problem that comes with this is the need to have 2 service shosts. Each service host is tied to unique class (service contract implementation). Since we are using “self created” host we can’t create 2 service hosts to implement 2 unique classes.
This is one of the drawback of WCF. Unlike .net remoting where we can add multiple instants of service host under single host, we can’t do same in WCF.
Using IIS as host can help solve this issue.
Key Points
1) Each WCF service class implements at least one service contract, which defines the operations this service exposes.
2) For distributing different set of service to multiple numbers of clients, class can implement multiple endpoints each with a unique service contract.
3) Minimum 1 end point for each service host.
4) Each service host is tied up to only one implementation of contract (class)
5) To expose multiple services, you can open multiple service Host instances within the same host process.
5)
6) Although you can have multiple endpoints with a single service but only service type.
7) You can also dynamically create service with different implementing types. This can be achieved by dynamically creating new Service Hosts.
8) Each endpoint should have unique relative address
WCF Configuration Editor
This tool can be accessed from Visual Studio interface. Go to Tools ---->WCF Configuration Editor.

Read the help file for details. In summary:
1) Open the config file that was generated after running svcutility. This will populate different placeholders in GUI with relevant data. Click on EndPoint folder to view existing configuration. This information can be changed for the GUI without even touching XML file

2) Click on Diagnostics folder and use Toggle switch to browse through various settings. Check out help file for details.

3) Closing the editor after changes will update the changes in the original app.config that was opened in first step. If we open config file, we see additional tags added to perform all the functions that we proposed in GUI.
4) Click on Host.exe file to start the service. Click on client.exe to start the client. All the events will be logged in file(s) whose location(s) can be set from "Diagnostic" folder in GUI.
Tuesday, August 21, 2007
Rules for Successful BAM implementation
I learnt from my experience that by observing following rules BAM execution can become fairly smooth: Some of the steps are not "need to have" but rather "good to have".
1) Install SQL 2005 sp2
2) Ensure Analysis Services is installed (Else cubes/aggregations can't be created)
3) Do not forget to Configure BAM tools to "Enable Analysis Services for Aggregation" using Biztalk config tool. (Else cubes/aggregations can't be created)
4) Ensure that account being used is a member of the Group that is configured in Biztalk Config tool for BAM portal. (Else views in BAM portal may not be visible to the user )
5) Ensure that the user account under which BAM Application Pool is running is member of Biztalk Isolated Host and IIS_WG group.
6)Run following commands: (Else you may get 401 authentication error)
setspn.exe can be found under the Windows 2003 CD-ROM at \support\tools\suptools.msi
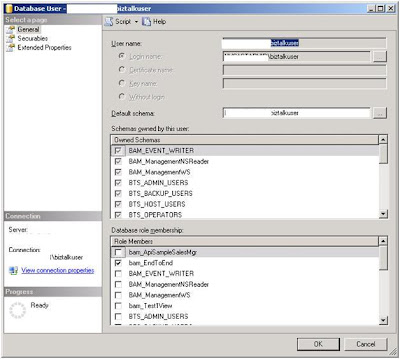
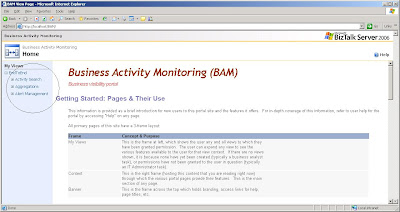
If you view the BAM portal but can't view all the "VIEWS" you created. It is most likely that the account you are using does not have permissions on "BAMPrimaryImport" table. Add that account (i.e, biztalkuser) and then assign the role (view) you want that user to see on BAMPortal. Check the image below:
1) Install SQL 2005 sp2
2) Ensure Analysis Services is installed (Else cubes/aggregations can't be created)
3) Do not forget to Configure BAM tools to "Enable Analysis Services for Aggregation" using Biztalk config tool. (Else cubes/aggregations can't be created)
4) Ensure that account being used is a member of the Group that is configured in Biztalk Config tool for BAM portal. (Else views in BAM portal may not be visible to the user )
5) Ensure that the user account under which BAM Application Pool is running is member of Biztalk Isolated Host and IIS_WG group.
6)Run following commands: (Else you may get 401 authentication error)
- cscript adsutil.vbs SET w3svc/NtAuthenticationProviders "NTLM"
- setspn -A HTTP/servername domain\account
- setspn -A HTTP/servername.fullyqualifieddomainname domain\account
domain\account is account under which BAM App Pool is running on IIS.
cscript can be found under: C:\Inetpub\AdminScriptssetspn.exe can be found under the Windows 2003 CD-ROM at \support\tools\suptools.msi
If you view the BAM portal but can't view all the "VIEWS" you created. It is most likely that the account you are using does not have permissions on "BAMPrimaryImport" table. Add that account (i.e, biztalkuser) and then assign the role (view) you want that user to see on BAMPortal. Check the image below:
In the image above. The user (biztalkuser) only have permission for bam_EndToEnd. If you want this user to see other views that you can for example click on "bam_Test1View". User will now be able to see both views on BAM portal. This way you can selectively grant users access to different views(roles).
Please note: SQL 2005 creates Roles. You just have to assign them to the appropriate user. SQL 2005 does not supports concept of "Groups" anymore. Instead use Roles.
Friday, August 17, 2007
Strange behavior of Biztalk 2006 on SQL cluster environment
While testing Biztalk application on server farm mode at one of my client, I came across something interesting. This biztalk application used SQL adapter to connect from orchestration to execute stored proc. All tests for server farm went OK. Biztalk server fail over sequence worked fine. Net scala worked fine for web farm. We ran into issue when we tried failing over SQL cluster from original (initial) node to another. On the original node, everything worked perfect. On failing over to second node, I found that Biztalk application would not connect to the custom database to execute stored procedure. We thought may be it is a connection pool caching issue. We tried restarting the physical biztalk servers and hosts. Nothing worked. Then I thought that may be it is something to do with 32 Bit SQL adapter not working properly on 64 bit cluster (not a very smart assumption on retrospection). We also played with MSDTC settings by reducing the authentication level. Nothing worked. The fact that threw me off was that everything was working fine on original node. We only had one physical copy of entire Biztalk database on cluster and not multiple database instances. So, it did not make sense to me as if why the same database was acting differently with different instances of SQL on each node.
I thought logically for 4 hours and tried different things. Nothing worked. I came back next day and starting thinking out of box or rather illogically. We gave explicit permissions to Biztalk service account on the "custom" database that contained stored procedures. We made Biztalk service account database owner and wolla! it worked! Yeah that simple! We could not understand the behavior but it worked. We thought of doing further post mortem. We took the permission away and failed over to original cluster node. It worked as it was working before. For some reasons Biztalk did not care for permissions while working on original node. We failed over again to second node without the permissions and it did not work again. We granted the permissions and it worked!
We left the solution in that working state! But could not explain the reason for this behavior. We have couple of theories but none of them convincing. Is it a Bug? May be. Is it a cluster configuration? May be.
I thought logically for 4 hours and tried different things. Nothing worked. I came back next day and starting thinking out of box or rather illogically. We gave explicit permissions to Biztalk service account on the "custom" database that contained stored procedures. We made Biztalk service account database owner and wolla! it worked! Yeah that simple! We could not understand the behavior but it worked. We thought of doing further post mortem. We took the permission away and failed over to original cluster node. It worked as it was working before. For some reasons Biztalk did not care for permissions while working on original node. We failed over again to second node without the permissions and it did not work again. We granted the permissions and it worked!
We left the solution in that working state! But could not explain the reason for this behavior. We have couple of theories but none of them convincing. Is it a Bug? May be. Is it a cluster configuration? May be.
Tuesday, August 07, 2007
Biztalk and SilverLight
Gloves are off! MSFT is going head on against Adobe. With recent launch of Silverlight, a product that will compete against market leader Flash. MSFT dreams to snatch some serious business from Adobe. With Java version not lagging behind, market has just started heating up.
SilverLight will enable developers deliver rich browser based applications. Great new tool for web developers. Richer out of Box BAM portal is one area that Biztalk can gain from this new development. Rich BAM portal with interactive charts and graphical real time display of data can really grab attention of Business Users. How about adding this on Biztalk 2008 wishlist!
SilverLight will enable developers deliver rich browser based applications. Great new tool for web developers. Richer out of Box BAM portal is one area that Biztalk can gain from this new development. Rich BAM portal with interactive charts and graphical real time display of data can really grab attention of Business Users. How about adding this on Biztalk 2008 wishlist!
Monday, August 06, 2007
Implementing Business Rule Engine
This weekend I got down and dirty with BRE (Business Rule Engine). It is a powerful tool for managing dynamic business rules. It is very efficient in complex logic scenarios. I thought of playing with it and worked out some scenarios.
Scenario:
Company wants to categorize its workers under different “Bonus” levels to decide on dollar value of annual bonuses. Each bonus level is based on variables like Number of Projects sold, Dollar value of each project sold. Is it a new client or existing one? Other variables like future potential etc can also play in. This business logic can change over period of time and needs to be controlled by Business Analysts/ Management team. That means no complex SQL queries. In real world scenario, this means having a policy that can interact with multiple databases/tables on client side. This policy can be invoked by a webservice . This webservice will pass on objects as facts in the BRE. BRE will then update the specified columns in the database with the correct “Bonus” categories.
Scenarios can range from simple scenarios that take single object as input fact to complex scenarios that take multiple objects.
Proof of Concept :
1) Create a simple database called “TestRules”.
2) Create a table called “Customers”
3) Define 3 columns: Author, ID and Status
4) Create a policy called “Testing”.
5) Under this policy, define a rule “Test1” (Image 1)
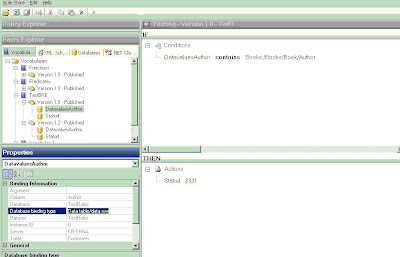
6) Define 2 Vocabularies TestBRE 1.0 and 1.2 (Image 2 and 3). Difference between them will be the nature of “Binding”. I will explain that later on.
Email me for complete solution @ shashi_1273@yahoo.com
Image 1:
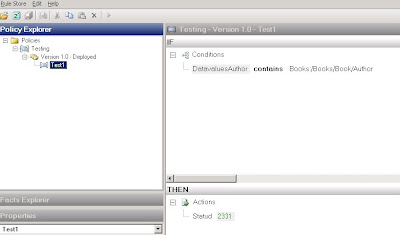 Image 2 (Database Binding type as DataConnection )
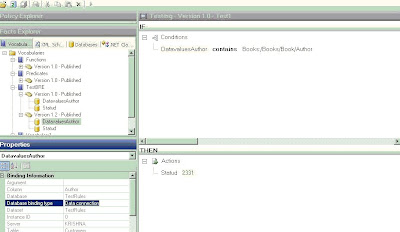
Image 3 (Database Binding type as Data Table/ Data Row )
There are 3 facts in the rule:
1. Name of Author (Coming from Database)
2. Input Object on right hand side of “Contains”. This can be a simple string that gives the lookup value as name of the “Author”. In a complex scenario this can be an XML object that contains multiple Fields for “Author”. These name(s) will be then matched against the “Author” column of database “Customers”.
3. StatuD under the action pane. This will be updated based on above 2 facts.
This policy can then be invoked by a WebService . This webservice will use Policy.execute method after passing the required object parameters. For this Proof of Concept solution we will use following combinations:
1) Passing Single Object as Parameter:
In this case the object passed will be database connection only. The second fact can be a hard coded string i.e. “Shashi”. In 2 object scenario we will use an XML object instead of "string". This XML object will be array of values.
Implementation for 2 object scenario will cover this section too.
2) Passing Two Objects as Parameter:
In this case the object passed will be database connection and a XML document. This XML document can contain multiple fields and one of the fields can be “Author”. This “Author” field can have multiple names. In our sample we have 3 names: Shashi, Kent and Jeff.
a) Database Binding type as DataConnection
b) Database Binding type as Data Table/ Data Row
Both of the above types can be set up while using Wizard to creating Vocabulary. Use DataConnection type if the count of rows returned is more than 10 (http://blogs.msdn.com/biztalkbre/ ). Otherwise use Data Table type. Also for Long Term Facts that are based on Caching, use Data Table/ Data Row Type. Reason being that no additional benefit will be gained by caching Dataconnection object as Connection Pool already does that. Implement IFact Retriever for Long Term facts. For this particular example, we will not use Long Term facts.
Important thing to note is that in case of Database facts ( with binding type Data Table/ Data Row ) and XML facts, Typed objects need to be used. .Net facts do not need any “Typing”. You will see in the implementation how both XML and Database facts use TypedXMLDocument and TypedDataTable respectively.
It is a good practice to create a tracking file to understand how BRE works and this file can also be used as a Debugging tool.
Implementation for Case a)
SqlConnection conn = new SqlConnection("Integrated Security = SSPI;Database= TestRules; Server =(local)"); // establish connection to server
conn.Open(); //open the connection
DataConnection dc = new DataConnection("TestRules", "Customers", conn);
XmlDocument xd1 = new XmlDocument();
xd1.Load(@"C:\BiztalkProjects\BRE\TestSmall.xml");
TypedXmlDocument doc1 = new TypedXmlDocument("Books", xd1);
object[] shortTermFacts = new object[2];
shortTermFacts[0] = doc1;
shortTermFacts[1] = dc; // Note: No Typed dataset being used in this implementation
Policy pol = new Policy("Testing",1,0);
DebugTrackingInterceptor dtraking = new DebugTrackingInterceptor("ShashiOut.txt");
try
{ pol.Execute(shortTermFacts, dtraking);
dc.Update();
conn.Close();
}
catch (Exception ex)
{ System.Console.WriteLine(ex.ToString()); }
Implementation for Case b)
SqlConnection conn = new SqlConnection("Integrated Security = SSPI;Database= TestRules; Server =(local)"); // establish connection to server
conn.Open(); //open the connection
SqlDataAdapter da = new SqlDataAdapter("select * from Customers", conn); // create adapter to fill dataset .
//------explicitly define Update method for database adapter object. Directly using da.update will give error
SqlCommandBuilder commBldr= new SqlCommandBuilder(da);
commBldr.GetUpdateCommand();
da.UpdateCommand = commBldr.GetUpdateCommand();
//...
DataSet ds = new DataSet("TestRules"); // create a dataset
da.Fill(ds, "Customers"); //fill dataset
//....Not required for Single Object scenario
XmlDocument xd1 = new XmlDocument();
xd1.Load(@"C:\BiztalkProjects\BRE\TestSmall.xml"); //xml instance to be passed
TypedXmlDocument doc1 = new TypedXmlDocument("Books", xd1);
//............
TypedDataTable tdc = new TypedDataTable(ds.Tables["Customers"]);
// Only pass one fact (tdc) for single object scenario (First scenario)
object[] shortTermFacts = new object[2];
shortTermFacts[0] = doc1;
shortTermFacts[1] = tdc;
Scenario:
Company wants to categorize its workers under different “Bonus” levels to decide on dollar value of annual bonuses. Each bonus level is based on variables like Number of Projects sold, Dollar value of each project sold. Is it a new client or existing one? Other variables like future potential etc can also play in. This business logic can change over period of time and needs to be controlled by Business Analysts/ Management team. That means no complex SQL queries. In real world scenario, this means having a policy that can interact with multiple databases/tables on client side. This policy can be invoked by a webservice . This webservice will pass on objects as facts in the BRE. BRE will then update the specified columns in the database with the correct “Bonus” categories.
Scenarios can range from simple scenarios that take single object as input fact to complex scenarios that take multiple objects.
Proof of Concept :
1) Create a simple database called “TestRules”.
2) Create a table called “Customers”
3) Define 3 columns: Author, ID and Status
4) Create a policy called “Testing”.
5) Under this policy, define a rule “Test1” (Image 1)
6) Define 2 Vocabularies TestBRE 1.0 and 1.2 (Image 2 and 3). Difference between them will be the nature of “Binding”. I will explain that later on.
Email me for complete solution @ shashi_1273@yahoo.com
Image 1:
Image 2 (Database Binding type as DataConnection )Image 3 (Database Binding type as Data Table/ Data Row )
There are 3 facts in the rule:
1. Name of Author (Coming from Database)
2. Input Object on right hand side of “Contains”. This can be a simple string that gives the lookup value as name of the “Author”. In a complex scenario this can be an XML object that contains multiple Fields for “Author”. These name(s) will be then matched against the “Author” column of database “Customers”.
3. StatuD under the action pane. This will be updated based on above 2 facts.
This policy can then be invoked by a WebService . This webservice will use Policy.execute method after passing the required object parameters. For this Proof of Concept solution we will use following combinations:
1) Passing Single Object as Parameter:
In this case the object passed will be database connection only. The second fact can be a hard coded string i.e. “Shashi”. In 2 object scenario we will use an XML object instead of "string". This XML object will be array of values.
Implementation for 2 object scenario will cover this section too.
2) Passing Two Objects as Parameter:
In this case the object passed will be database connection and a XML document. This XML document can contain multiple fields and one of the fields can be “Author”. This “Author” field can have multiple names. In our sample we have 3 names: Shashi, Kent and Jeff.
a) Database Binding type as DataConnection
b) Database Binding type as Data Table/ Data Row
Both of the above types can be set up while using Wizard to creating Vocabulary. Use DataConnection type if the count of rows returned is more than 10 (http://blogs.msdn.com/biztalkbre/ ). Otherwise use Data Table type. Also for Long Term Facts that are based on Caching, use Data Table/ Data Row Type. Reason being that no additional benefit will be gained by caching Dataconnection object as Connection Pool already does that. Implement IFact Retriever for Long Term facts. For this particular example, we will not use Long Term facts.
Important thing to note is that in case of Database facts ( with binding type Data Table/ Data Row ) and XML facts, Typed objects need to be used. .Net facts do not need any “Typing”. You will see in the implementation how both XML and Database facts use TypedXMLDocument and TypedDataTable respectively.
It is a good practice to create a tracking file to understand how BRE works and this file can also be used as a Debugging tool.
Implementation for Case a)
SqlConnection conn = new SqlConnection("Integrated Security = SSPI;Database= TestRules; Server =(local)"); // establish connection to server
conn.Open(); //open the connection
DataConnection dc = new DataConnection("TestRules", "Customers", conn);
XmlDocument xd1 = new XmlDocument();
xd1.Load(@"C:\BiztalkProjects\BRE\TestSmall.xml");
TypedXmlDocument doc1 = new TypedXmlDocument("Books", xd1);
object[] shortTermFacts = new object[2];
shortTermFacts[0] = doc1;
shortTermFacts[1] = dc; // Note: No Typed dataset being used in this implementation
Policy pol = new Policy("Testing",1,0);
DebugTrackingInterceptor dtraking = new DebugTrackingInterceptor("ShashiOut.txt");
try
{ pol.Execute(shortTermFacts, dtraking);
dc.Update();
conn.Close();
}
catch (Exception ex)
{ System.Console.WriteLine(ex.ToString()); }
Implementation for Case b)
SqlConnection conn = new SqlConnection("Integrated Security = SSPI;Database= TestRules; Server =(local)"); // establish connection to server
conn.Open(); //open the connection
SqlDataAdapter da = new SqlDataAdapter("select * from Customers", conn); // create adapter to fill dataset .
//------explicitly define Update method for database adapter object. Directly using da.update will give error
SqlCommandBuilder commBldr= new SqlCommandBuilder(da);
commBldr.GetUpdateCommand();
da.UpdateCommand = commBldr.GetUpdateCommand();
//...
DataSet ds = new DataSet("TestRules"); // create a dataset
da.Fill(ds, "Customers"); //fill dataset
//....Not required for Single Object scenario
XmlDocument xd1 = new XmlDocument();
xd1.Load(@"C:\BiztalkProjects\BRE\TestSmall.xml"); //xml instance to be passed
TypedXmlDocument doc1 = new TypedXmlDocument("Books", xd1);
//............
TypedDataTable tdc = new TypedDataTable(ds.Tables["Customers"]);
// Only pass one fact (tdc) for single object scenario (First scenario)
object[] shortTermFacts = new object[2];
shortTermFacts[0] = doc1;
shortTermFacts[1] = tdc;
Policy pol = new Policy("Testing",1,0); //Major and Minor Versions
DebugTrackingInterceptor dtraking = new DebugTrackingInterceptor("ShashiOut.txt"); //writes the debug file under the "bin" folder.
try
{ pol.Execute(shortTermFacts, dtraking);
da.Update(ds,"Customers");
conn.Close();
} catch (Exception ex)
{ System.Console.WriteLine(ex.ToString()); }
}
}
}
Take Away :
1) While testing a Policy, BRE create Database connection/objects. While executing the policy from .net class, database objects need to be explicitly created.
2) It is a good practice to create tracking file while executing policy. This can help to troubleshoot issues while development. It can also be compared with the tracking log that is created by Business Rule composer when Testing a policy. This way we can observe the list of parameters that policy is expecting and make sure that these parameters are correcly passed while executing the same policy from outside Rule Composer. By comparing these 2 logs, I was able to figure out when policy is expecting TypedXMLDocument and TypedDataTable.
3) DataSet object and XML document have to be passed as "Typed".
4) The 2 Object scenario can be extended for multiple Objects.
5) I know it is very painful to copy and create new versions of policy whenever any modifications are required. Same applies to vocab. Following SQL commands can ease that pain by undeploying the policies/vocabs and allowing users to do modifications. It is highly recommended that these commands are used only in Development phase.
For Policies:
declare @RuleSetId Int
select @RuleSetID =nRuleSetID
FROM re_Ruleset
WHERE strName = 'Testing'
AND nMajor=1 and nMinor=0
UPDATE re_ruleset
SET nStatus =0
WHERE nRuleSetID = @RuleSetID
DELETE FROM re_deployment_config WHERE nRuleSetID=@RuleSetID
DELETE from re_tracking_id WHERE nRuleSetID=@RuleSetID
For Vocabs:
UPDATE re_VocabularySET nStatus = 0 /* to republish make it back to 1 */
WHERE strName = 'Vocabulary1' AND nMajor =1 AND nMinor=0
I think BRE is a very powerful tool if used properly. Key is to use it for complex scenarios that can leverage functions like Update, Assert, Retract. Using it for simple queries is an example of under utilization of tool. In terms of performance, BRE will work better than traditional SQL query in case of complex scenarios.
It is not truely a Business User tool. Concepts of version, vocabulary and facts are not easy for a business user to understand. Also, the fact that any policy that deployed can't be changed unless a new version is created is not helpful either. Developers are required for initial set up and creating new vocab etc. Business users can definitely change variable values that are already set up. They will need some training to do more than that.
I would imagine that MSFT understands these concerns and we can definitely see improvements in subsequent versions.
Subscribe to:
Posts (Atom)


_511.gif)
_530.gif)
